header

Monday 19 March 2012

Busy Busy Busy

Just got back from Leeds where I was collecting my daughter from University as its her Easter break.I know it seems a bit early but they have loads of work to do,  namely revision for exams when they get back so they need the time. 

My daughter
Its always a long drive up the M1 what with the 50mph average speed restrictions and stops for the loo and a coffee etc so we normally stay over night at a hotel and come back the next day. The stop over also gives my daughter chance to get us to do some odd jobs for her in her rented house and to pack all her stuff. Why she is never packed when we get there we haven't been able to work out. We aren't complaining though as we do get to have a bit of a break from home.

We normally stay at the same hotel each time we visit but this time we decided to have a change. We wont be doing that again, sadly the new hotel left a lot to be desired, so next time we are back to the tried and trusted Village Hotel which is excellent. 

I thought when I got back I better just catch up with any blog comments and as my daughter pointed out actually reply to comments rather than just comment on comments ...if you see what I mean. I am  afraid I had not noticed the word reply which appears under each blog comment so had simply just added another comment beneath each time. This of course means people who have made comments may think I have never replied and I'm rude. So please accept my apologies if that includes you.

I am off tomorrow for a bit of a break in Norfolk with my parents so will not be blogging for a bit so see you soon. I did tell my hubby since hes still at home  he could do some blogging, but he declined, so keep the faith followers I'll be back soon. Ha! Ha!

Saturday 17 March 2012

A Blog Award

Today I found I had been awarded a Liebster Blog Award by Sutty at http://fruitofmyscraps.blogspot.co.uk/. What was this award I wondered, well I visited her blog and did a little digging of my own and found that this award is given to bloggers who inspire you and have less than 200 followers.The Liebster Award takes it’s name from the German word meaning Beloved, Dearest or Favorite. I must say I was very chuffed,thanks Sutty you have quite made my day.


 As an award winner all that is required of you, in accepting the award is to adhere to the  tradition that you pass the award along to five bloggers that have motivated and inspired you. It is sort of passing along the love

To accept the award you must:
1. Link back to the person who gave it to you and thank them
2. Post the award to your blog
3. Give the award to five bloggers with less than 200 followers that you    appreciate and value.
4. Leave a comment on the 5 blogs to let them know that they have been   offered this award.


Now for my five…

Miss B  http://thetwiningvine.blogspot.co.uk There is always something interesting to read and the pictures are great. Its a real fun blog.

Fiona  http://oakfieldcrafts.blogspot.co.uk This lady makes some great cards and she also does some fab demos at various craft shows

Pauline http://mrsocraftyblog.blogspot.co.uk This ladies site always has something different and I love her blogging style always good to read.

Stella  http://stellastuffblog.blogspot.co.uk My friends blog is fairly new but already shes got some interesting stuff going on.

Nelly http://heshaw.blogspot.co.uk This lady makes some great cards and her blog is always got some great ideas

plus one blog that's up and coming

Lily  http://lilyandtamsin.blogspot.co.uk This blogger has a great writing style and its always a good read.

I hope all my nominees for this award  are pleased by me passing the award along to them, and if so please pass it along to five blogs that inspire them . 

Friday 16 March 2012

A Twist on the Scotch Egg

I'm always looking for different ideas for recipes. So when a few years back I saw, in a magazine a recipe for  scotch eggs with a difference I thought,  "That's something I have to try". Well over the years the recipe has vanished and my version now is I think quite different from the original. The one thing I can say is its still a dish which is very popular. For my current version of this dish you will need.

Ingredients  . 

400g (14oz) ( Pork Mince (lean)
1 tub Philadelphia Cheese
1 large Red Onion
Salt 
Pepper
1tsp Chilli Flakes (if you like things spicy)
250g (8oz)Porridge Oats


Method 
Pre-heat oven to 200o C,400oF Gas Mark 6
Place a sheet of baking paper onto a tray or work top and then scatter a layer of porridge oats over it.

Divide the pork mince into 5-6 portions depending on how big you want your final scotch eggs to be     
Mix the cheese with the finely chopped onions and add salt and pepper.


Now take a portion of the pork mince and flatten in your hands and place on the oats


Place a portion of the cheese onion mix into the centre of the pork  as seen below.


Then carefully bring the edges of the pork together to form a ball. firm gently in the hands and roll in the oats so the ball is completely covered. Note there is no need to coat in raw egg as oats stick to the surface very well.

The finished pork ball
  Place the finished pork balls into the oven and cook for approx 30 mins.
server with salad or chips or whatever you fancy. My husband actually enjoy them when they are cold sliced in crispy rolls 


Thursday 15 March 2012

What not to do with a new Kitchen Knife

Yesterday I bought a new small Victorinox kitchen knife. Well John Lewis/Waitrose had a sale of kitchen stuff and I needed a new small knife and there was this seemly ideal knife. It was very sharp and light weight just what I had been looking for. But folks be warned it was very, very, very sharp and I should have taken more care I know now. See below 


My advice is don't be a numpty like me and never just drop sharp knives into your washing up bowl and then put your hand into said bowl without knowing exactly where the knives are. Better yet don't put them into the bowl in the first place. I can assure you locating such a sharp knife with your fingers is reckless to say the least and in my case completely foolhardy and painful.  

The much bandaged fingers
~So beware of knives ha! ha!

Wednesday 14 March 2012

Cards, Cards, Cards.

As I said a few post back I was given a pack of Papermainia Enchanted Fairies of Little Venice Stepper Cards to make. Well those I made up and have shared the images with you. Here though, are some of the other cards I made up using the left over bits and pieces plus a pack of A4 papers and toppers sheet from the same series. I think perhaps I had a rogue pack of stepper cards as I am sure I had more decoupage sheets in my pack. I was therefore able to make several more cards lucky old me. 


The above cards were made entirely from the paper pack and the scraps from the stepper card pack
 
These later two I made using the topper set.
 
I am rather pleased with the overall look of the cards. I am especially thrilled they used up left overs yet still look good.        

Tuesday 13 March 2012

Spring Treats

I had a special request the other day to make some treats. The only condition was due Lent this treat had to be chocolate free. I decided as  I didn't have an awful lot of time coconut ice was the answer. I also thought its a great thing for children to make as a mothers day treat as its easy to make and more importantly does not require cooking. Why don't you give it a try? You will need:

Ingredients 
375g Dessicated Coconut 
375 g Icing Sugar
397g Can of Condensed Milk
Food Colouring

The ingredients
Method 

Place coconut and icing sugar into a bowl then pour over the condensed milk.
Mix these ingredients thoroughly

Once mixed divide into two portions one remains white the other add a few drops of food colouring and mix carefully. I find sometimes when Ive added the food colouring it helps to add just a little sprinkle more icing sugar as the food colouring increases stickiness.

Line a baking  tray with baking parchment or cling film either seems to work.

Put white mix into the base of the tray and press down firmly. You want a layer of about 1cm. Then add the coloured layer and press down firmly.

Place in the fridge for a few hours or even better still over night

Then tip out onto a sheet of icing sugar dusted baking parchment or chapping block and cut into squares 
  
Coconut icing being cut into cubes
The finished item
 After they are cut into cubes place these in boxes or bags to give as gifts. I like the little cellophane bags as they can be tied with ribbons and look really cute.        

I chose yellow and white but pink and white is usually traditional

Monday 12 March 2012

Cheese and Onion Bread

My husband and I (doesn't that sound grand) have recently been a wee bit extravagant buying new bits of kit for the kitchen,well why not I ask you? The kettle ,mixer and blender were getting on a bit and we need to move into the twenty first century. So last weekend we bought said items from John Lewis and they are so pretty. See below for some shots       

The Food Mixer and Processor in all their glory

Well since we had the equipment it was essential we then used them so over the weekend we did some baking and in the couple of posts you will be able to see the outcome.

The first thing we (that's hubby and me) made was some Cheese and Onion Bread and boy was it scrumptious. If you want to try them out see the recipe below.

Ingredients 
 550g (20 oz) Strong White Flour
1tsp salt
2 tsp English Mustard
1 Onion (red or white)
300g (11 oz) Strong Cheddar Cheese     
300ml (10 fl oz) Tepid /warm water
2 Eggs
2tsp Fast Acting Yeast.
1 tsp Oil 
Black Pepper

The assembled ingredients
Method

First put salt flour and mustard in a bowl then added the onion and cheese both of which have been cut into cubes.Mix them gently together  


The mustard onions and cheese mixed together 


Add yeast one egg and water into a jug and whisk them together until smooth . 


Then add the wet ingredients to the dry ingredients and mix with the dough hook on the mixer until a smooth soft dough is created.


 Cover the bowl with a cloth and allow the mixture to rest and prove for about 10 minutes.


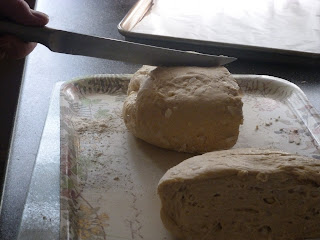
After 10 minutes turn out the dough onto an oiled tray/worktop and kneed for about 10 seconds.Then return the dough to the bowl and allow to stand for 1 hour  this allows the bread to prove.


After 1 hour turn dough our onto a tray and divide it into 6 - 8 equal pieces. Shape into long roll/sausage shapes and place these onto a lined baking tray.
Cover and leave until the rolls have about doubled in size.
 
Whilst rolls are proving pre-heat oven to 220 C or gas Mark 7


Once rolls have risen brush with beaten egg and pepper them before placing in the oven to cook for about 20 minutes or until golden brown    


The finished item
We also do this same recipe with chilli flakes which give an interesting taste.Alternatively you could replace the onion with sun-dried tomatoes. 

Sunday 11 March 2012

Mother's Day Ideas

Whilst I was making perfumed sachets for Valentines Day I also used some oddments of fabric to make a number of of other bags/sachets  which  I filled with lavender and rose potpourri. the fabric wasn't exactly on a Valentine theme but I thought they might come in useful later. Now they have I decided to fancy them up a bit for Mothers Day gifts  

A few of the perfumed sachets I made
 Its very easy to create the sachets just squares or rectangles of fabric sewn together and stuffed with polyester filling and a perfumed sachet inside.Once made I grouped them into threes and then tied them with pretty ribbons and added some silk flowers. I also made a few individual ones, as you can see from the picture below .   

  
The finished items
I think these are very pretty and yet simple to make. They also make your linen smell great and keep away moths when put into drawers etc. 

Friday 9 March 2012

Getting Up to Date


Well. today at last I am up to date with my regular scrapbooking. By that I mean the scrap book in which I keep a photos graphic record of the events which happen throughout the year. I like to use this set of books as, well,  a  picture diary. Ive done it ever since I started scrapbooking a few years ago they look better and are more interesting than just photos in albums. Don't get me wrong I still have loads of pictures in albums and on CD's but I prefer the scrapbooks. 

I still have numerous other things on the go so scrapbooking doesn't stop. As I have already said I have started to put a 'This is Your Life' book together for my daughter so pages from this project will feature from time to time. However. I thought you might like to see my latest scrapbook diary page.

My husabnd on Dartmoor

The pictures are of my husband looking out across the misty and slightly wintery wastes of  Dartmoor. Shortly after these shots were taken it began to snow.  I'm not sure why  he had to get out of a perfectly warm car but I think he was trying to capture the atmosphere. The title 'On a clear Day' was meant to be a little ironic.

Anyway to do this page I used some of Tim Holtz products. The background paper is from the Tim Holtz Kraft Core Nostalgic collection.. I sanded the edges of the sheet then distressed the whole page with Tim Holtz Distress Inks in  Forest Moss and Old Paper.

First, I added about a quarter of the way down the page an adhesive black and clear border from K & Co which had a bird and vegetation motif.

I then added slightly off centre,vertically a scrap of  card which I had embossed with a brick wall design embossing folder (another Tim Holtz product). The torn edges of this card I distressed again using the distress inks. Using another piece of the same card I used another of the Tim Holtz embossing folders this time one that created a bark like effect. To highlight the design I used another of the distress inks before  adding it horizontally  to the page about  two thirds of the way down the page. 


I also added two scraps of die card from my stash of paper which I had distressed with Forest Moss, On I placed vertically the other horizontally to give a lighter background to the area in which I was to put the photographs.

In keeping with the natural theme I added a K &Co border which had ladybirds and leaves on it plus an additional copper metal border from my stash. I placed these borders over the join of the other card pieces to improve the overall finish.
Close up to show borders
I mounted the trimmed photos on black card and then added to them to the page as shown. To the larger of the pictures I also added a small strip of gold punched border to give it a slight flourish. 
      
Close up showing border and embossing

I finished the page with the title using die cut letters and some strips of journalling to help recall the day.

I'm pleased with the final page I think the overall effect is quite masculine and rugged which I think reflects the subject (man on Dartmoor) very well.

Thursday 8 March 2012

A Little Enchantment

Today I was given a pack of stepper cards to make from the Docrafts Papermania Enchanted Fairies of Little Venice. www.docrafts.com This is not my normal style of card but they looked pretty and Papermania stuff is usually nice quality to work with so I decided to make them up. Lets be honest when its a gift you don't want to to be all sniffy do you?
The whole collection. image from www.docrafts.com 
 Anyway the 6 x 6 Stepper card set comprised 4 printed cards,2 Die cut sheets and 4 expandable envelopes. the quality was great and very easy to work with. Having made 4 cards as you can see below I still have sufficient bits to make several other cards. I have got to say I was impressed.
   
The Stepper pack retails at approx £4.50


I made two cards with this image


A close up of the image
This design had two fairies to use you could have both images on the one card but I chose to only use one
A close up of the above card.

I could have of course added glitter and gems but felt these additional flourishes I'd use on the remaining decoupage elements as the card back grounds were so detailed and I don't like things becoming over fussy.
I like the finished results I hope you like them too.


Wednesday 7 March 2012

Easter Cards

 Whilst I was at the Marlborough 'Make It' show I picked up some Lilly of the Valley Die Cut Design Sheets (http://www.liliofthevalley.co.uk/) I'm not normally into this sort of thing, the cutie pie stuff, however, these are cute without being too cute.

 I got some Christmas,wedding and birthday designs, plus a sheet referred to as Spring Rabbits, which I thought might make some rather different Easter cards.Anyway have a look and see what you think.  


Just a few of the cards